


Using React-email to create templates for Mailchain
A guide to creating custom email templates with React-Email and integrating with Mailchain for secure and efficient communication in Web3


Table of contents
- TLDR;
- Setting up a Next.js App with react-email and Mailchain
- Building Custom Email Templates with react-email
- Rendering React Email Templates
- Generating and Hashing OTPs
- Getting Started with Mailchain
- Building Handlers for Sending Emails through Mailchain and Verifying OTPs
- Integrating Mailchain and OTP Handlers with Frontend
- The Final Look of Our App
- Conclusion
In Web3, communication can be a complicated issue with no standard way to handle it. Many applications rely on users linking another method of contact, such as email or a phone number, which can compromise privacy and reveal identities.
That's where Mailchain comes in. It consists of an open-source, multi-chain protocol for sending encrypted messages between blockchain wallet addresses and a unified inbox application that functions just like email.
By integrating Mailchain with React-Email, we can create custom email templates that provide an even better user experience for viewing emails.
In this article, we'll walk through the process of integrating Mailchain with React-Email, create a sign-in process using OTP for added security, and share some best practices for secure and efficient email communication.
TLDR;
By integrating Mailchain with your web3 application, you can securely send emails between blockchain wallet addresses. React-email can be used to enhance the UI/UX of your emails. Access the complete source code for this article's implementation from here.
Setting up a Next.js App with react-email and Mailchain
Now that we've introduced Mailchain and React-Email, it's time to start setting up our Next.js app. Setting up a Next.js app with React-Email and Mailchain is a straightforward process that involves installing the necessary dependencies, configuring the environment variables, and setting up the necessary files and folders.
First, create a new Next.js app using:
npx create-next-app@latest
# or
yarn create next-app
# or
pnpm create next-app
During the initialization process, you will be prompted with a series of questions. While setting up the project, it is recommended to not choose src as we will be working with the root folder.
After making your selections, Next.js will create a new project directory called react-mailchain. You can navigate to this directory by running:
cd react-mailchain
Now we will add all the necessary dependencies related to react-email and mailchain-sdk.
Here is how to install react-email and integrate it into your project folder:
npm install react-email @react-email/button @react-email/html -E
Next, include the following script in the scripts in package.json:
scripts: {
    "email-dev": "email dev"
}
Also, create a new folder named emails in the root folder and add a file named verifyOTP.tsx:
mkdir emails
touch emails/verifyOTP.tsx
I chose to create the emails folder in the root directory because I encountered an issue running npm run email-dev when the folder was located inside the src directory. I am currently exploring potential solutions for this problem and will update the blog if I find one.
To add mailchain-sdk, it's simple:
npm install @mailchain/sdk
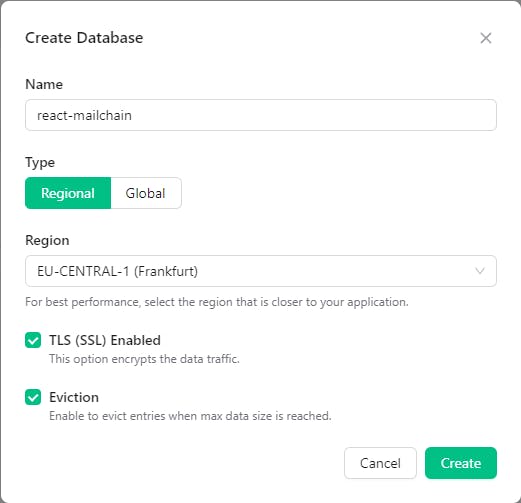
Setting up Redis is quick and easy with Upstash. Simply sign up and create a Redis database, which should take less than 30 seconds. For optimal security and flexibility, it's recommended to choose TLS and Eviction options during the creation process.
After setting up your database, add NEXT_PUBLIC_REDIS_URL in .env, for example:
NEXT_PUBLIC_REDIS_URL=rediss://default:********@eu2-expert-yak-30385.upstash.io:30385 # replace ***** with your DB password
Then, add ioredis to access the Redis database by:
npm i ioredis --save
npm install --save-dev @types/node
Then, add the following to your next.config.js as dns, tls, or net is available only on the server-side in Next.js:
/* next.config.js */
webpack: (config, { isServer }) => {
    if (!isServer) {
      config.resolve.fallback.fs = false;
      config.resolve.fallback.dns = false;
      config.resolve.fallback.net = false;
      config.resolve.fallback.tls = false;
    }
    return config;
  },
Now that the setup is complete, it's time to start building the email template for the OTP that we'll be sending to Mailchain addresses.
Building Custom Email Templates with react-email
With react-email, creating email templates is a breeze. It's similar to writing React components but using pre-built components provided by react-email. To preview your templates and see exactly how they will look in an email client, you can use the command npm run email-dev, which we added to the scripts section in package.json during the setup process.
To explore a range of examples for templates created using react-email, you can visit the following URL: demo.react.email/preview/airbnb-review. This can be a helpful resource to learn and understand how react-email works. You can find a variety of examples on this page that can be used for inspiration and guidance as you build your templates.
Let's start building the template for verifying the OTP in the verifyOTP.tsx file we generated earlier.
/* emails/verifyOTP.tsx */
import {
  Body,
  Container,
  Head,
  Heading,
  Html,
  Img,
  Section,
  Tailwind,
  Text,
} from "@react-email/components";

interface VerifyOTPProps {
  validationCode?: number;
}

const LOGO_URL = "https://image.lexica.art/full_jpg/1910b029-fc0c-44c2-9408-b89e77d5f345";

export const VerifyOTP = ({ validationCode }: VerifyOTPProps) => (
  <Html>
    <Tailwind>
      <Head />
      <Body className="font-sans bg-gray-50">
        <Container className="bg-white border border-gray-200 rounded-lg shadow-md mt-8 mx-auto p-8">
          <div className="flex flex-col items-center">
            <Img
              src={`${LOGO_URL}`}
              width={88}
              height={88}
              alt=""
              className="my-4"
            />
            <Text className="text-blue-500 text-xs font-bold tracking-wide uppercase mb-2">
              Verify Your Identity
            </Text>
            <Heading className="text-gray-800 text-2xl font-medium text-center mb-4">
              Enter the following code to verify your identity.
            </Heading>
          </div>
          <Section className="bg-gray-100 rounded-md px-4 py-6 flex items-center justify-center mb-6">
            <Text className="text-4xl font-bold text-gray-800 tracking-wide">
              {validationCode}
            </Text>
          </Section>
          <Text className="text-gray-600 text-base font-normal leading-6 text-center">
            If you did not request this code, please disregard this message.
          </Text>
        </Container>
      </Body>
    </Tailwind>
  </Html>
);
To build a template using react-email, you will create a <Html> component and define all the required child components inside it. In the example above, we have used the following components: <Body>, <Container>, <Img>, <Text>, <Section>, and <Heading>. We have also wrapped the entire component tree with the <Tailwind> component to enable the use of Tailwind CSS within the child components.
To make the template dynamic and include the OTP, we have added a validationCode prop to the VerifyOTP component. This prop allows us to pass the validation code as a string to the component from wherever we render it.
Once rendered, it is going to look something like this:

React-email provides a variety of components to use in building your templates. You can find more information about these components in the react-email documentation, where they have provided detailed examples of how to use each component.
Rendering React Email Templates
The render function from @react-email/render is an utility function used to render React components into HTML code that can be sent as an email. It takes a React component as input, along with any necessary props, and returns an HTML string representing the rendered email.
/* utils/renderVerifyOTP.tsx */
import { render } from "@react-email/render":

export const renderVerifyOTP = (otp: number) => {
  const html = render(<VerifyOTP validationCode={otp} />, { pretty: true });
  return html;
};
This HTML is then passed on to the mailchain utility functions discussed in the previous section. The pretty option passed to therender function is used to add whitespace and indentation to the resulting HTML for readability.
Generating and Hashing OTPs
Now, it's time to generate OTP, convert them into hashes, and then save those hashes to the Redis database.
Generating Secure OTP
The generateSecureOTP function generates a 6-digit one-time password (OTP) using randomBytes() method from the crypto package. It converts the generated random bytes into a number and pads it with leading zeros if needed to ensure it is a 6-digit number. The resulting OTP is then returned as a number.
/* utils/otpUtils.ts*/
import crypto from "crypto";

export const generateSecureOTP = (): number => {
  const buffer = crypto.randomBytes(4);
  const OTP = buffer.readUInt32BE(0) % 1000000;
  return Number(OTP.toString().padStart(6, "0"));
};
Hashing OTP
The hashOTP function takes a number (OTP) as input and returns a hashed version of it using the SHA-256 algorithm. Hashing is a one-way process that converts the input into a fixed-length string of characters, which is commonly used for storing passwords or sensitive information.
/* utils/otpUtils.ts*/
import crypto from "crypto";

export const hashOTP = (otp: number): string => {
  const hash = crypto.createHash("sha256");
  hash.update(otp.toString());
  return hash.digest("hex");
};
Storing OTP Hash
The storeOTPHash function stores the hashed OTP in Redis with an expiration time of 5 minutes. It uses the Redis client to connect to the Redis server and set the key-value pair. Finally, it disconnects from the Redis server.
/* utils/otpUtils.ts*/
import { Redis } from "ioredis";

export const storeOTPHash = async (mail: string, hash: string) => {
  const redis = new Redis(process.env.NEXT_PUBLIC_REDIS_URL!);
  await redis.set(`otpHash:${mail}`, hash, "EX", 60 * 5);
  redis.disconnect();
};
Verifying OTP Hash
The readOTPHash function retrieves the OTP hash associated with a given email address from Redis. The verifyOTP function takes an email address and an OTP as input, retrieves the OTP hash from Redis using the readOTPHash function hashes the OTP using the hashOTP function, and then compares the hashed OTP to the stored OTP hash. If they match, the function returns true.
/* utils/otpUtils.ts*/
import { Redis } from "ioredis";

export const readOTPHash = async (mail: string): Promise<string | null> => {
  const redis = new Redis(process.env.NEXT_PUBLIC_REDIS_URL!);
  const response = await redis.get(`otpHash:${mail}`);
  redis.disconnect();
  return response;
};

export const verifyOTP = async (
  mail: string,
  otp: number
): Promise<boolean> => {
  const hash = await readOTPHash(mail);
  const hashedOTP = hashOTP(otp);
  return hashedOTP === hash;
};
Getting Started with Mailchain
Let's take a moment to familiarize ourselves with the mailchain-sdk. The documentation for mailchain-sdk is user-friendly and straightforward to implement.
Mailchain requires a Secret Recovery Phrase or a Private Messaging Key to send emails to other supported Web3 identities. It is important to safeguard these sensitive pieces of information since if leaked, anyone can impersonate and send emails on your behalf.
Therefore, storing them securely is crucial to prevent unauthorized access.
To send emails via mailchain-sdk, there are two methods available for you to choose from:
Using your Secret Recovery Phrase
using your Private Messaging Key
Using your Secret Recovery Phrase
It will send the email through your default Mailchain (e.g. 0xkeshav@mailchain.com) that is provided to you upon creating your account. It is unique for each account.
The sendMailchainSimple() function, located in utils/mailchainUtils.tsx sends an email using Mailchain and requires a secret recovery phrase set as an environment variable. It generates a 6-digit OTP using generateSecureOTP() function from utils/otpUtils.tsx renders the OTP in a React-email template and sends the email to the recipient specified in the to parameter. The OTP is included in the subject line of the email. The function then stores the OTP hash in Redis and returns an object with the data and error properties.
/* utils/mailchainUtils.ts */
export const sendMailchainSimple = async (to: string) => {
  const secretRecoveryPhrase = process.env.NEXT_PUBLIC_SECRET_RECOVERY_PHRASE!;

  if (secretRecoveryPhrase === undefined) {
    throw new Error("You must provide a secret recovery phrase in .env");
  }

  const mailchain = Mailchain.fromSecretRecoveryPhrase(secretRecoveryPhrase);

  const fromAddress = await mailchain.user();
  const code = generateSecureOTP();  // generating 6 digits OTP using crypto.randomBytes(4)
  const emailHtml = renderVerifyOTP(Number(code));  // rendering React-email component to HTML

  // sending mail
  const { data, error } = await mailchain.sendMail({
    from: fromAddress.address,
    to: [to],
    subject: `Your verification code for SwiftSignup registration: ${code}`,
    content: {
      text: `Your verification code for SwiftSignup registration: ${code}`,
      html: emailHtml,
    },
  });

  await storeOTPHash(to, hashOTP(Number(code)));  // storing OTP hash to redis
  return { data, error };
};
Using your Private Messaging Key
It will send the email through the mail address associated with that private messaging key. Using this approach, you can send emails using different identities, such as an ENS domain (e.g., 0xkeshav.eth@ens.mailchain.com) or a LENS domain (e.g., 0xkeshav.lens@lens.mailchain.com), utilizing their respective private messaging key, which can be found in your Mailchain settings.
Note: In case you have doubts about the security of your private messaging key, it is advisable to register your wallet or protocol address again to create a new private messaging key.
sendMailchainSpecificAddress function is similar to sendMailchainSimple but uses a private messaging key instead of a secret recovery phrase. It generates a 6-digit OTP, renders it in a React-email template, sends it to the specified recipient address using the private messaging key, stores the OTP hash in Redis, and returns an object indicating the result of sending the email.
    /* utils/mailchainUtils.ts */
    export const sendMailchainSpecificAddress = async (toAddress: string) => {
      const pvtMsgKeyHex = process.env.NEXT_PUBLIC_PRIVATE_MESSAGING_KEY!;

      if (pvtMsgKeyHex === undefined) {
        throw new Error("You must provide a private messaging key in .env");
      }

      const privateMessagingKey = privateMessagingKeyFromHex(pvtMsgKeyHex);

      const mailSender = MailSender.fromSenderMessagingKey(privateMessagingKey);

      const fromAddress = process.env.NEXT_PUBLIC_SENDER_ADDRESS!;

      if (fromAddress === undefined) {
        throw new Error("You must provide a sender address along with its private messaging key in .env");
      }

      const code = generateSecureOTP();  // generating 6 digits OTP using crypto.randomBytes(4)
      const emailHtml = renderVerifyOTP(Number(code));  // rendering React-email component  to HTML

      // sending mail
      const { data, error } = await mailSender.sendMail({
        from: fromAddress,
        to: [toAddress],
        subject: `Your verification code for SwiftSignup registration: ${code}`,
        content: {
          text: `Your verification code for SwiftSignup registration: ${code}`,
          html: emailHtml,
        },
      });

      await storeOTPHash(toAddress, hashOTP(Number(code)));  // storing OTP hash to redis
      return { data, error };
    };
Now that we have a good understanding of how Mailchain works, we can move on to generating the necessary APIs and creating frontend components that allow users to send OTPs to their Mailchain address through our API.
Building Handlers for Sending Emails through Mailchain and Verifying OTPs
We will be required to generate three API Handlers:
Send Mail through Secret Recovery Phrase
Send Mail through Private Messaging Key
Verifying OTPs
Send Mail through Secret Recovery Phrase
This route handler accepts a POST request with a to parameter representing the Mailchain address to send an email to. It then calls the sendMailchainSimple function from the mailchainUtils module to send an email through Mailchain. If the function is successful, it returns a response with the data property containing the sent email information, else it returns a response with the error property containing the error message.
/* pages/api/sendMailchainSimple.ts */
import { sendMailchainSimple } from "@/utils/mailchainUtils";
import { SentMail } from "@mailchain/sdk";
import type { NextApiRequest, NextApiResponse } from "next";

type Data = {
  data?: SentMail | undefined;
  error?: string;
};

export default async function handler(
  req: NextApiRequest,
  res: NextApiResponse<Data>
) {
  try {
    const params = req.body;

    const { data, error } = await sendMailchainSimple(params.to);

    if (error) {
      throw new Error("Mailchain error: " + error.message);
    }

    res.status(200).send({ data });
  } catch (error) {
    if (error instanceof Error) {
      res.status(500).send({ error: error.message });
    }
  }
}
Send Mail through Private Messaging Key
This route handler handles a request and sends an email to a specific address using Mailchain's private messaging key.
/* pages/api/sendMailchainSimple.ts */
import { sendMailchainSpecificAddress } from "@/utils/mailchainUtils";
import type { NextApiRequest, NextApiResponse } from "next";

type Data = {
  data?: any;
  error?: string;
};

export default async function handler(
  req: NextApiRequest,
  res: NextApiResponse<Data>
) {
  try {
    const params = req.body;
    const { data, error } = await sendMailchainSpecificAddress(params.to);

    if (error) {
      throw new Error("Mailchain error: " + error.message);
    }

    res.status(200).send({ data });
  } catch (error) {
    if (error instanceof Error) {
      res.status(500).send({ error: error.message });
    }
  }
}
Verifying OTPs
This route handler verifies the received OTP against the hashed OTP stored in Redis for a particular email address. It receives the OTP and email from the request body and uses the verifyOTP() function from the otpUtils module to verify it. Finally, it returns a JSON response with a result field indicating whether the OTP was valid or not.
import { verifyOTP } from "@/utils/otpUtils";
import { NextApiRequest, NextApiResponse } from "next";

export default async function handler(
  req: NextApiRequest,
  res: NextApiResponse
) {
  const { otp, mail } = req.body;

  const result = await verifyOTP(mail, Number(otp));

  res.status(200).json({ result });
}
Note: Deploying the app on Vercel may result in a gateway timeout error due to the mailchain-sdk taking more than 5 seconds to respond to requests, and Vercel having a timeout limit of 5 seconds for its free tier. This could lead to a 504 gateway timeout error.
Integrating Mailchain and OTP Handlers with Frontend
Now, it's time to put your hard work to the test by building two components: Signin.tsx and Otp.tsx, which we will use in our pages/index.tsx. You can easily copy the source code of both components and the pages/index.tsx file to speed up the process.
We will still discuss the two most important parts of these components i.e. handleSubmit() function.
Signin.tsx
It sends a POST request using Axios to the /api/sendSimpleMail endpoint to send an email to the entered email address. If the email is sent successfully, it sets the mailchainAddr state to the entered email and triggers the isSignin state to true to show the OTP input field.
/* components/Signin.tsx */
// ... (more code above)
const handleSubmit = async (e: React.FormEvent<HTMLFormElement>) => {
    e.preventDefault();
    setIsLoading(true);

    try {
    // Axios Post request to send mail when hit submit button
        const { data: sendMail } = await axios({
        method: "POST",
        url: "/api/sendSimpleMail",
        data: {
          to: email,
        },
      });

      if (!sendMail.savedMessageId) {
        console.log("Mail sent successfully!");
        setMailchainAddr(email);
        setIsSignin(true);
        }
    } catch (error) {
      console.error(error);
      }

    setIsLoading(false);
};
// ... (more code below)
Otp.tsx
It handles the OTP form submission by sending a POST request to the server to verify the OTP entered by the user. The result is logged to the console and if successful, the user is set as verified.
/* components/Otp.tsx */
// ... (more code above)
const handleSubmit = async (e: React.FormEvent<HTMLFormElement>) => {
    e.preventDefault();
    // Here you can add your API call to verify the OTP and complete the signin process

    const { data } = await axios({
      method: "POST",
      url: "/api/verifyOTP",
      data: {
        mail: mail,
        otp: otp,
      },
    });

    console.log(data.result);
    if (data.result) {
      setVerified(true);
    } else {
      setOTP("");
      setVerified(false);
    }
  };
// ... (more code below)
Now that we have developed both the frontend and backend, it's time to run the command npm run dev to test our application.
The Final Look of Our App
Check out the final result of our Mailchain sign-in flow implemented with React-Email and OTP verification. Watch the GIF below to see how the app flows from start to finish:

Conclusion
In conclusion, Mailchain provides a secure way of sending emails to web3 identities. By integrating Mailchain with React-Email, we can customize the email templates and improve the user experience of viewing emails. Additionally, using OTP for authentication provides an added layer of security to the sign-in process.
However, it is important to remember that sensitive information such as the Secret Recovery Phrase or Private Messaging Key must be securely stored to prevent unauthorized access. Overall, Mailchain and React-Email can help us achieve secure and efficient email communication in the web3 world.
I hope you found this article helpful and informative. If you enjoyed it, be sure to like and follow for more articles in the future. If you have any questions, you can find me on Twitter. Thank you for reading!"